Search This Blog

Thursday, 30 August 2012

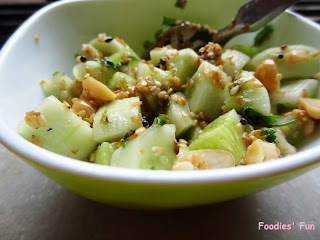
Cucumber Salad with peanuts


The other day I was at my uncle’s place. On the table laid a cooking book- The Samsung Book of Microwave Cooking by Rohini Singh. I was just browsing through the book were this recipe in salad section caught my eyes. I found it interesting and had to try it soon, salads being my favourite. After making it, it surprised me as it not only added flavours to my regular salad but it is very simple to make which took less than 15 minutes.


Bored of eating regular green salad, try this recipe for sure. Such an interesting blend of flavours !!!

Preparation time: 5 minutes
Making time: 7 minutes
Serves: 4

What goes in it:

Cucumber, diced- 2 medium sized
Lemon juice- of ½ lemon or as per your taste
Peanuts- 2 tbl spn
Sesame seeds (Til) - 1 tbl spn
Oil- 1 tbl spn
Mustard seeds- ¼ tbl spn
Asafoetida (Hing)- ¼ tbl spn
Green chillies, finely chopped- ¼  tbl spn
Coriander leaves, chopped- ½ cup

How did I make it:

Peel the skin of cucumber. Cut cucumber into cubes.


Add lemon juice to it and set aside the bowl.

Take a small pan and roast peanuts till they turn little brown. Put roasted peanuts in cucumber bowl.


In the same pan, roast sesame seeds till they turn light brown. Be careful as the seeds will pop outside. Add this sesame seeds the bowl.


Now out little oil in the same pan. Heat it and sauté mustard seeds. Let them pop properly and add hing and chopped chillies to it. Take it off the stove and add to the bowl. Put salt to the mixture and mix them all well.


Roasting peanuts and sesame seeds wil take about 2 minutes each. And tempering will also take about 2 minutes. 
Garnish with coriander leaves.


In about 10 minutes, the cucumber salad is ready to be served.

Sunday, 26 August 2012

Stuffed Potato (Mexican style)


Stuffed Mexican Potato- a very tempting and delicious dish when served hot.


I learnt this recipe from my sister in law Shruti. I became fan of this dish from the day one. Easy to prepare and ingredients easily available which is what makes stuffed potatoes my favourite and don’t forget to add on the yummy baked taste of potato and cheese with Mexican flavours.

So here’s how I made my Sunday, cooking my favourite dish...  Try it and it will be your favourite too...

Preparation time: 10 minutes
Cooking time: 30 minutes
Serves: 12 potatoes

What goes in it:

Potato, boiled- 6 small sized
Tomato, finely chopped- 1 small sized
Onion, finely chopped- 1 small sized
Garlic- ½ tbl spn
Oregano- ¼ tbl spn
Chilly Flakes- ¼ tbl spn
Mixed Herbs- ¼ tbl spn
Salt- to taste
Oil- 1 tbl spn
Butter- 2 tbl spn
Cheese, grated- ½ cup
Coriander, chopped- ½ cup

How did I make it:

Wash and peel the skin of potatoes. Cut them into halves lengthwise so that you can make proper scooped potatoes.


[Foodies Note:  Take small and medium sized round potatoes so that it can be scooped meticulously.]

Boil them in water with a pinch of salt in it. Don’t make them too mushy. After it is boiled drain off the water and scoop the potato with the help of a spoon. Keep them aside.

Scooped Potato

While potatoes are being boiled and let cooled prepare for stuffing. Finely chop tomatoes, onions and coriander leaves.

In a small kadai take little oil and sauté garlic till it turns brown. Add onions and potato to it and sauté for about 1-2 minutes. Now put in oregano, chilly flakes, mixed herbs and little salt. Add chopped coriander leaves to it and mix them all well. Let it cook for about 2 minutes. The kitchen will be filled with tasty aromatic flavours.
[Foodies Note: Add little salt as you are going to use cheese and butter which have salty taste.]

Ready Stuffing

Keep it aside and start preparing for roasting potatoes. Take a pan and switch off the stove. Apply butter to halved potatoes. And roast both the sides of potato on it on low flame till they become golden brown.

Roast first side

Turn them and roast second side

Lay them on a plate
Stuff the scooped potatoes with the prepared filling. .


Top is off with the grated cheese


Bake the stuffed potatoes in the pan on low flame. 


Close the lid. Bake till you can see tempting melted cheese. This will take about 5 minutes.


Serve this Mexican style stuffed potatoes hot to your family/ friends/ guests and have fun with mouthful of stuffed potato. 

Friday, 24 August 2012

Chinese-Cheese Maggie


Without getting into much integrities of how and why, I will directly like to share with you “Meri Masala Maggie” recipe. I blended pinch of chinese flavour with cheese to the Maggie. Well I am not so innovative, this I learnt from my lil sister. She always tries different add-on to masala Maggie.


Quickly let me show you how I made it...

Preparation time: 5 minutes
Cooking time: 7 minutes

What goes in it:

Maggie- 1 portion
Maggie tastemaker- 1 packet
Water- ½ glass
Butter- 2 tbl spn
Tabasco pepper sauce- 4-5 drops
Chinese soya sauce- 4-5 drops
Carrot, thinly sliced- ½ carrot
Capsicum, thinly sliced- ¼ capsicum
Cabbage, finely sliced-  ¼ cabbage
Onion, sliced- ½ onion
Cheese, grated- ½ cup
How did I make it:

Cut carrot and capsicum in finger shaped, vertically slice onions and finely cut cabbage.

Take a pan and heat butter in it. Sauté vegetables in it. Put drops of tabascco pepper sauce and soya sauce to add spicy taste to maggie. Tabasco will give a bit spicy peppery taste which will be a good combination with cheese. Soya sauce will give chinese taste and colour.

Cook it for about 2-3 minutes with the lid closed. Don’t overcook the vegetables; let them be partially raw. Switch off the stove and keep sautéed vegetables aside.


In the same pan, boil the water. Add tastemaker to it. Then add maggie to it. Let it cook for about 1-2 minutes. Now add the vegetables to it. Boil it once.


As we all know it takes 5 minutes to make a maggie.

Take it out in a plate and grate cheese on top off it while it still hot. Melted cheese will add taste to it.


Now have this yummy chinese style cheesy maggie which adds spicy-sweet taste to your taste buds... J

This was my masala maggie story. Share me yours because we all eat maggie since our childhood and I am sure we all have our ways to cook it.

Thursday, 23 August 2012

Garlic Brinjal Potato Sabzi


This recipe was taught to me by a friend. Actually I visited her place and superb aroma came from the kitchen. I straight away went to the kitchen to find out what was being cooked. Here, I saw green garlic for the first time. It was being sautéed. Quickly I grasped the recipe narrated by her.


Often I make this vegetable at home especially in winter season whem there ia ample supply of green garlic. It is liked by all as it is yummy and tastes different than traditional brinjal recipes.

Preparation time: 20 minutes to cut and fry vegetables add 10 minutes to finely chop the garlic
Cooking time: 5 minutes
Serves: For 5 people

What goes in it:

Green garlic, chopped- 1 cup
Long purple brinjal (Eggplant), sliced- 10 medium sized
Potato, sliced- 4 medium sized
Turmeric powder- 1 tbl spn
Red chilli powder- 2 tbl spn
Coriander-cumin powder- 2 tbl spn
Salt- as per your taste
Oil- to fry

How did I make it:

Finely chop green garlic. And it should be green garlic not the ordinary garlic. 
[Foodies’ Note: Use of fresh green garlic will give a splendid taste to the vegetable]

Wash brinjal properly and pat it dry. Slice them.


Peel off potatoes, wash them and cut into slices.


While you are cutting vegetables, pour oil in a frying pan and let it heat. After it heats up, fry sliced brinjal and potato till they are brown in colour. This will take about 15 minutes.


Soak off the extra oil from fried vegetable on an absorbent paper.

Now pour out extra oil from the frying pan keeping about 2 tbl spn of oil in the pan. This should be fine to sauté green garlic.


As the oil heats up, put garlic to it. Sauté it for about 2-3 minutes till they turn golden brown. Add salt, turmeric powder, red chilli powder & coriander-cumin powder to it. Mix them all well. Now put fried brinjal and potato and season generously.

Put off the stove and the vegetable is ready to be served.


Goes well with wheat chapatti...

Tuesday, 21 August 2012

Chokha Rotla with Potato Onion Sabzi


My mom and sister are fond of eating rice flatbread. Recently my neighbour aunt was teaching mom how 2 make one. The following week I tried to cook it with the help of mom. Along with it made onion-potato ki subzi. The combo tastes delicious and yummm...


Rice flatbread or popularly known as Chokha no rotlo in Gujarat is simple to make and adds variety to routine regime of eating wheat chappati...

Preparation time: 5 minutes
Cooking time: 20 minutes
Makes: 6
What goes in it:

Rice flour- 2 cup
Water- 1 glass
Salt to taste

How did I make it:

Take rice flour in a flat plate. Keep on adding water to the flour little by little to knead the dough till it becomes soft, pliable and does not stick to your palms. Divide into equal parts and make rounds of it.


Make rotla (flatbread) out of the dough balls. Pat the dough balls with the help of palms. [Foodies Note: It’s an effort taking task but to make it less tough dump lot of with rice/wheat flour on the dough ball]

As you pat, the rotla should rotate circularly. This will increase the size and minimize the thickness of rotla.


While you pat the rotla, heat the griddle.

Put this rotla on the griddle and cook both the sides till brown spots appear and make sure do not overcook it (completely brown) orelse it no longer will look a rice flatbread.


To puff the rotla, dab the second side on the flatbread with a cloth.

It will taste amazing when you serve the rotlas hot. You can have chokha rotla with any of the kathiyawadi vegetable like Stuffed brinjal, Lasaniya Aloo and like. We at home had it with yummy Onion-Potato Sabzi. 

The recipe goes as...

Preparation time: 10 minutes
Cooking time: 5 minutes
Serves: 4

What goes in it:

Potato, diced & boiled- 2 medium sized
Onion, sliced vertically- 2 medium sized
Sesame seeds (Til)- 1 tbl spn
Ginger-Garlic-Green Chili paste- 1 tbl spn
Garam Masala- ½ tbl spn
Turmeric powder- ½ tbl spn
Coriander-cumin powder- 1 tbl spn
Curry leaves-1 sprig
Salt- as per your taste
Oil- 2 tbl spn

How did I make it:

Dice potato and boil them. Let it cool.

Vertically slice the onions half.

Take a kadai and put oil in it. Heat it on flame. As it heats up, put curry leaves, sesame seeds and garlic-ginger-chilli paste. Saute for about a minute. Put onions to it. Add salt, turmeric powder, garam masala & coriander-cumin seeds. Mix them all well. Let it cook for about 5 minutes.


Finally add potato along with water. Stir generously and let it cook for another 3-4 minutes.


And the yummy spicy vegetable is ready to be served with hot ricebread (chokha no rotlo). 

Sunday, 19 August 2012

Golpapdi

Golpapdi or paak or sukhdi is one of my favourite sweet since childhood. It tastes all the more yummy when served hot. This is always made by my mom for me. So today I tried my hands on it. It’s simple and quick to make plus the ingredients are easily available in our kitchen.


Next time if guests arrive on short notice, you always have a simple and tempting dessert/sweet recipe on mind.

Preparation time:  5 minutes
Cooking time: 15 minutes
Makes: 20 pieces

What goes in it:

Wheat Flour- 2 cup
Ghee- 1 cup
Edible Gum (Gond), crushed- 100 gms
Jaggery, diced- ½ cup

How did I make it:

Take a kadai. Put wheat flour & ghee in it. Keep on stirring it on low flame till the mixture turns golden brown.


Add crushed gond to it. Stir it gently on low flame till pop sound of gond disappears.


Keep it aside till we melt jaggery.

Now in another kadai, take jaggery. Melt it with the help of ghee. Stir jaggery and ghee together on a low flame till it dissolves completely.


Add this melted jaggery to the original wheat flour mixture and mix them both properly.


Pour it in a plate and Spread it evenly.


Cut into square pieces while still warm.


Serve this warm and tempting paak/ sukhdi/ golpapdi...